This groove idea combines constant 16th notes on the bass drum, a standard right hand pattern as eighth or quarter notes and snares played as syncopated eighth notes. I will assume that you have worked on some double kick parts before and can keep a 16th note single stroke roll going between the feet at a decent tempo. Through this lesson you will be build up a basic version of the pattern step by step and then I will discuss variations on it. The aim here is to give you another groove construction idea whilst improving your ability to play constant note values on the feet whilst different things are happening with other limbs.
The individual parts of this pattern are very simple, but combining the timing and placement of the snare drums can easily throw you off. As mentioned above I will present the part in a 'step by step' format to help you understand more clearly what is going on. The rhythmic base for this lesson is the reverse of a similar lesson using a more standard '332' rhythm, this is linked at the bottom of the page a long with other lessons you may find helpful.
Step 1 - Right Hand And Feet
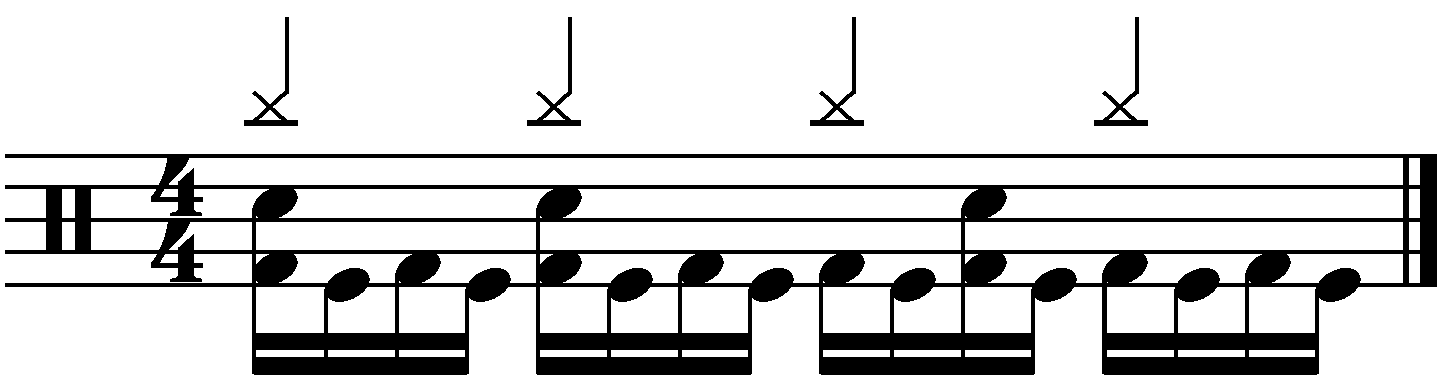
The foundation of this pattern will be a sixteenth note single stroke roll play over the two feet on bass drums with the right hand playing eighth notes, for the sake of this lesson that will be on the ride. That base pattern looks like this:
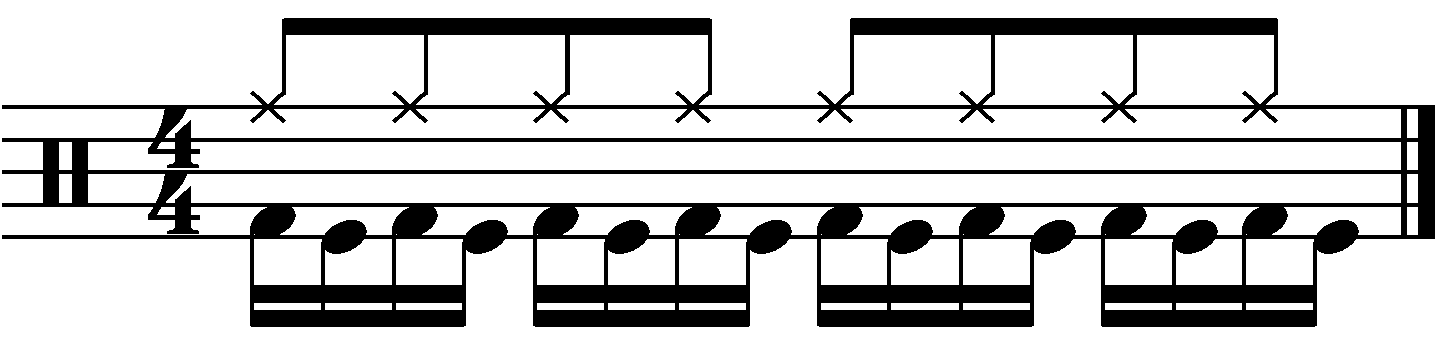
So that is very similar to exercises and groove patterns you will have seen in other double kick related lessons, nothing overly complicated. That said, make sure you can play this consistently at a decent tempo before moving on.
It was mentioned above that the full groove could be described as 'multi rhythmed'. The pattern above gives you the first two rhythms, straight sixteenths and straight eighths. The snares add in the final rhythm so let's look at that now.
Step 2 - Snares
The snare placement is the important part of this groove as it provides a more interesting rhythmic pattern. They will be playing an eighth note '2 3 3' type pattern, which is hopefully terminology you are familiar with by now. The numbers refer to groupings within a series of even notes, so you would have a group of two followed by two groups of three. This is shown in the bar of music below. I have placed an accent at the start of each grouping and used phrase marks above to clarify.

The way you will approach this for this groove is as individual note values. As the numbers are referring to eighth notes, a 3 could mean a dotted crotchet as that would last for three eighth notes worth of space. Using that logic a '2' would then mean a straight crotchet. Meaning the rhythm implied in that case is a crotchet followed by two dotted crotchets. So the rhythm the snares are going to play for the final groove will be this:

When put with the right hand the rhythm should be a bit clearer. Try that now, the notation is below.
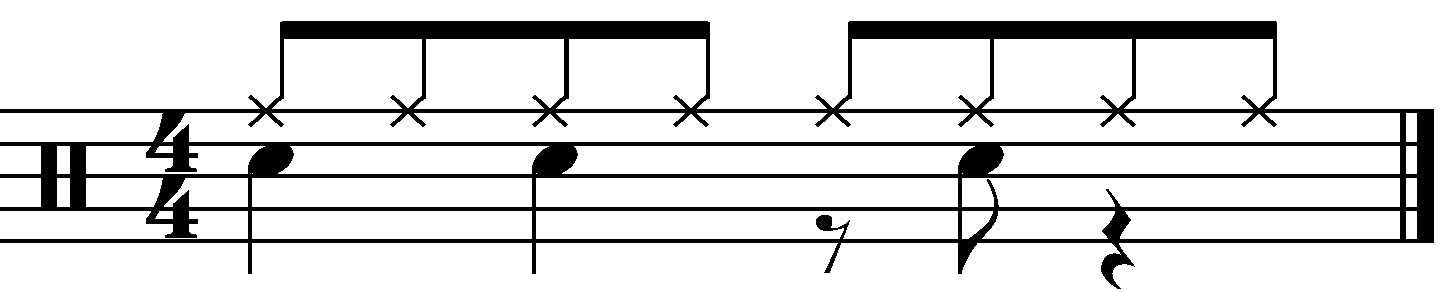
Before proceeding to the next step make sure you can play this two handed part comfortably. The final step will be putting it all together.
Step 3 - The Full Groove
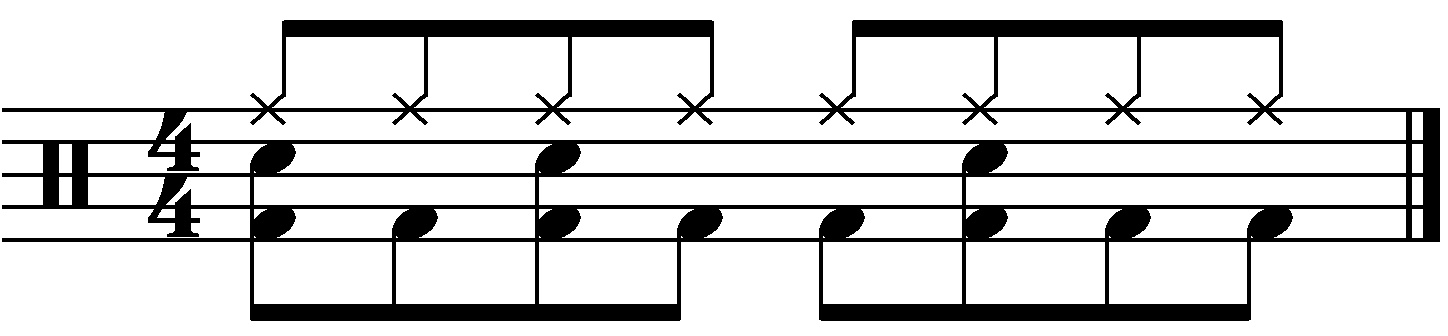
Finally you need to combine all the parts discussed above. First of all let's start with a version using a simplified single foot kick pattern. The pattern below takes the two hands and uses straight eighth notes on the right foot. The point of this is to get you comfortable with the placement of the snares whilst kick drums are involved. You need to make sure that all snares and bass drums fall together accurately otherwise the part will sound sloppy. Try that now:
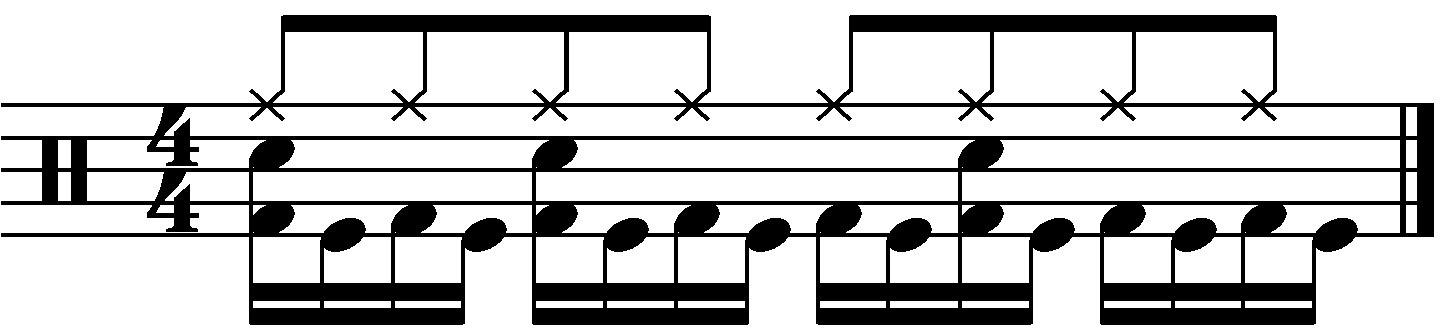
The final step is to add in the 16th note bass drums. To do that you just need to fill in the left foot between the right foot. All snares will always fall with a right foot which makes things a lot simpler. Once you are comfortable with the eighth note version try the full groove shown below. Don't be afraid to start slowly to make sure everything is falling in the right place, it's much easier to push the tempo of a pattern you are fully comfortable with. Here's the complete groove:
Simple Variations
Once you have learned the full version above and can play constantly at around 100bpm, try applying some of these simple variations that only involve switching around the right hand. These are the most basic changes to the pattern, more complicated ideas will be discussed in later lessons.
Variation 1 - Quarter Note Rides
As the title says, in this version switch the right hand ride part from eighth notes to quarter notes. This gives a bit more variety in your layers of rhythm. I have notated these on the second crash in this example for further variation in the groove.
Variation 2 - Follow The Snares With The Right Hand
This idea takes away from the 'multi layered' aspect of the groove but is a pretty cool pattern. All you do is play the same '2 3 3' rhythm with the right hand, so both hands are playing the same. I've shown this with the china cymbal below.

Variation 3 - Linear 2 3 3 Hands
In this version you will be playing around with a linear style pattern on the hands. The full groove won't strictly be linear as you will still have the 16th note feet under it. What you will end up with is something similar to the straight eighth 2 3 3 idea discussed above but split between two hands. The snare and right hand pattern is shown below, the snare is to be played with the left and the right the right as you would expect.

And then the same hand part with the feet applied. I have notated the snare in voice 1 here to clarify the hand movement. 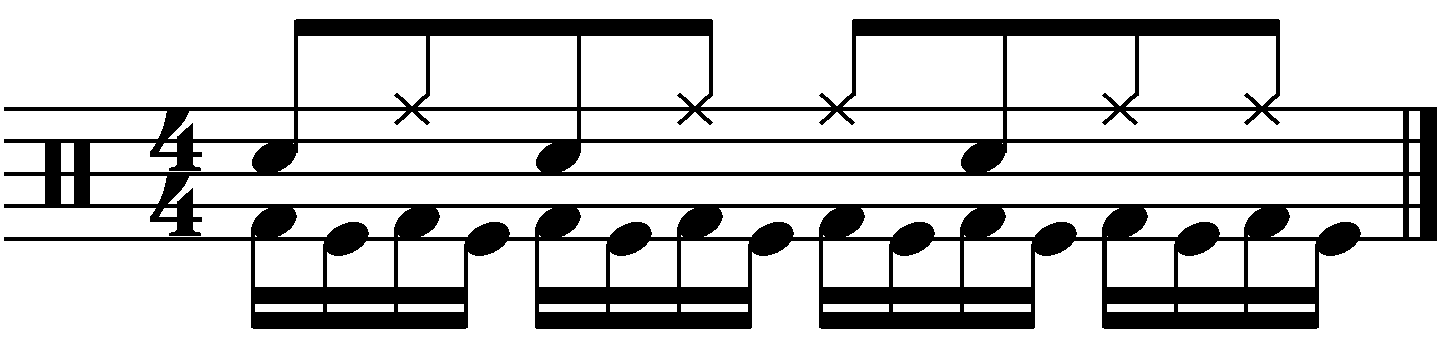
TASK
- Using the 2 minute rule, get all grooves and variations up to a tempo of at least 130bpm.
- Create further variations using the ideas presented.
- Apply these grooves to a phrased piece as either the groove or fill.
- Think about what other ways this pattern could be messed around with to create new patterns.
